A quick Overview on HP LoadRunner VuGen
As the name suggests, LoadRunner
is an automated performance testing product by HP. It works by generating actual load on the server, by replacing
human users with the virtual user also know as a VU.
After selecting protocol(s), [Protocol can be single or multiple, depending upon application requirements] the Recording pop up is
displayed. Application type drop down
allows you to record over a Web Application or on a desktop application (Win 32
application). Specify your application URL in the URL text box.
Recording Script
To organize the script, actions are used in loadrunner as available in HP Quick Test Professional. Three actions namely vuser_init (), Action () and vuser_end() are provided in default. If your application includes a Login area, you can record that part in the vuser_init() action and other steps in the Action() action. Click on start recording will open the browser with the URL specified by you. A floating tool bar will be displayed by which you can control recording options.
After you are done with the recording, click on stop
button. LoadRunner compiler will now
generate a script against all the steps you have performed. Verify the script
by running it. After running the status is displayed as Passed or Fail.
Once the script is created, a Recording summary is displayed containing the performed actions and used protocol. A snapshot for each browsed page is generated in the right side of the screen. If you wish to see the script, click on the Actions hyper link or click on the 'Script icon', you may also click on the 'Tree icon' in the tool bar, this will display thumbnails of all the pages in a tree structure.
Click on the 'Record Again' button to record again, click on it will display a warning to over write existing script or you may insert a new action.
Verify Replay
Vuser Run-time Settings
Before replaying the script, you should first review the settings. There are General run time settings (Tools menu > General Options) and Vuser run time settings (Vuser menu >> Run-time settings). Lets go through the Vuser run-time settings first.
Run Logic : Allows configure number of times you want to execute your script.
Pacing : Allow configure time between iterations. Set it to Random between 60 - 90 seconds.
Log : Allow logs configuration. Set it to Extended log with 1st radio on.
Think Time : Allow configuration of the time a user will probably take to interact with the application.Do not set it, choose Ignore option as this setting will be automatically handled through the Controller
Miscellaneous : Here you can set error handling, transaction and execution of script as a thread or process. By default it runs as a thread.
General Options
By default VuGen replays the script in background, if you want to see the steps being performed, you can watch it by configuring the general Options. A run-time window will be displayed when next time the script is executed. But this is not the actual steps getting performed, this will be the snapshots being recorded and returned by the vuser.
Here you are done with settings configuration. Let us replay the script. Click on the play icon presented in the tool bar, or you can click on the Start Replay button or you can also press F5 button to execute the script. After Replay a replay summary will be displayed. Also you will see Recorded and Replay page thumb nails in the right side panel.
To view results visually, you can goto View > Test Results. Alternatively you can click on the 'Visual test results' hyperlink presented in the Replay summary page
So this was a step by step quickie from my side,hope you people find it useful. Meet you again in next episode on HP Load Controller!! Do share with me your precious feedback and comments.
Let us understand and create a load test. In this post I will
be working on LoadRunner version 9.5
so the UI may vary with the latest version 11.5x.
As I discussed in my earlier post, the LoadRunner is categorized in four
components.
The product is so vast that it cannot be covered in a single
post. So, I will be covering LoadRunner in multiple posts. Keep visiting for
updates!!
Virtual user Generator (VuGen)
Also known as VuGen, this component allows capturing end
user business processes by generating an automated script against the performed actions. To open VuGen, Click on Start button >> Programs >> LoadRunner >> Applications >> Virtual User Generator. Let us get familiar with the interface.
On opening the VuGen, you will see a screen as displayed below.
TIP: Click on the Tasks icon in the tool box, so that you get to know the steps needed to create a script.
On opening the VuGen, you will see a screen as displayed below.
TIP: Click on the Tasks icon in the tool box, so that you get to know the steps needed to create a script.
 |
| LoadRunner 9.5 VuGen UI |
Record and Playback functionality is provided, which enables
the user to record the desired steps and playback to verify if the script
executes correctly. The recording mechanism works on Protocols (a language / medium which a client uses to communicate with the back end). If you will click on a New script, you will be asked to choose a Protocol.
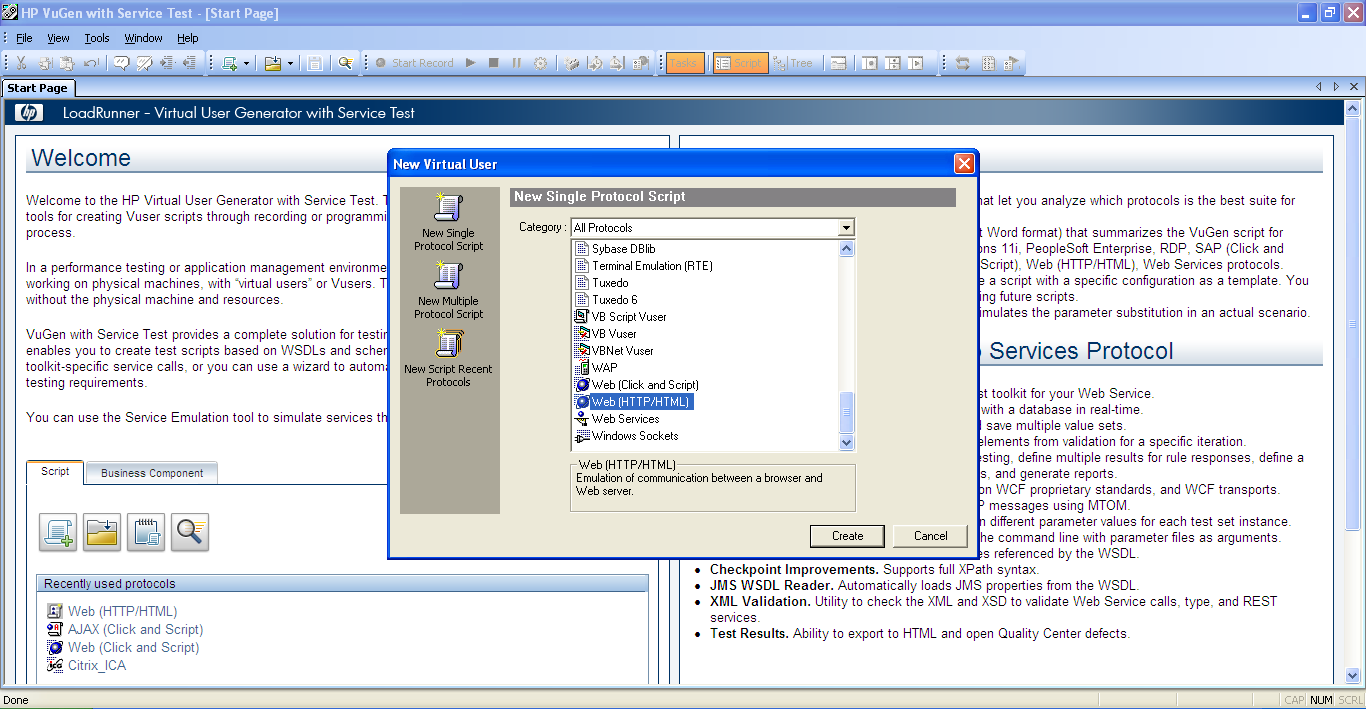 |
| Protocol Selection |
 |
| Recording window |
To organize the script, actions are used in loadrunner as available in HP Quick Test Professional. Three actions namely vuser_init (), Action () and vuser_end() are provided in default. If your application includes a Login area, you can record that part in the vuser_init() action and other steps in the Action() action. Click on start recording will open the browser with the URL specified by you. A floating tool bar will be displayed by which you can control recording options.
 |
| Floating recording tool bar |
Once the script is created, a Recording summary is displayed containing the performed actions and used protocol. A snapshot for each browsed page is generated in the right side of the screen. If you wish to see the script, click on the Actions hyper link or click on the 'Script icon', you may also click on the 'Tree icon' in the tool bar, this will display thumbnails of all the pages in a tree structure.
 |
| Recording summary |
Verify Replay
Vuser Run-time Settings
Before replaying the script, you should first review the settings. There are General run time settings (Tools menu > General Options) and Vuser run time settings (Vuser menu >> Run-time settings). Lets go through the Vuser run-time settings first.
 |
| Vuser Run-time settings |
Pacing : Allow configure time between iterations. Set it to Random between 60 - 90 seconds.
Log : Allow logs configuration. Set it to Extended log with 1st radio on.
Think Time : Allow configuration of the time a user will probably take to interact with the application.Do not set it, choose Ignore option as this setting will be automatically handled through the Controller
Miscellaneous : Here you can set error handling, transaction and execution of script as a thread or process. By default it runs as a thread.
General Options
By default VuGen replays the script in background, if you want to see the steps being performed, you can watch it by configuring the general Options. A run-time window will be displayed when next time the script is executed. But this is not the actual steps getting performed, this will be the snapshots being recorded and returned by the vuser.
 |
| LR General Options |
To view results visually, you can goto View > Test Results. Alternatively you can click on the 'Visual test results' hyperlink presented in the Replay summary page
 |
| Test Results |

Comments
Post a Comment